
Stores
Aurora can store information about each of your physical retail stores. This information can then be used for Collect In Store orders and a Store Finder.
This article gives an introduction to those two uses, and shows how stores are managed in Aurora.
Introduction
The Stores feature of Aurora allows you to hold and manage information on each of your physical retail stores. There are two main uses for this information:
- If the Collect In Store feature is enabled, these entries can then be used to present a list of stores to customers at the checkout, from which they can collect their order, as opposed to having it delivered to their home address.
- The stores that you enter can also be used in a front end Store Finder, which can list the closest stores to a customer, detailing each stores address, opening times and telephone number.
Viewing Stores
Stores are maintained on the Orders > Shipping > Stores page, which also contains an overview of all stores already set up in Aurora.

Stores can be maintained like other items in Aurora:
Item | Description |
|---|---|
Name | Specified the name of the store. |
Type | Specifies the mapped type of the store. |
Address | Details the address of the store. |
Active | Whether the store will be available on the front-end. |
Collect in Store? | Enable or disable the store for collecting orders. |
Edit | Edit the respective store. |
Delete | Delete the respective store. |
Adding and Editing Stores
New stores can be added by selecting the Add Store tab. Existing stores can be edited by selecting the Edit icon for the respective store.
The fields available when adding or editing a store are described below:
Item | Description |
|---|---|
Name | Specify the name of the store. This name will be displayed to customers. |
Type | Specify the store type. |
Filename | Specify the filename of the store. The value displayed within the store finder URL. |
Address | Use the address field to specify the address of the store. |
Country | Specify the country in which the store is located. |
Telephone | Provide the telephone number for the store. |
Opening Hours | State the opening hours for the store. |
Internal # | For tracking purposes, you may wish to provide your internal store ID. |
Latitude Longitude | The longitude and latitude can be used to simplify store location. |
Email Address | Provide the email address for the store. |
Collect In Store? | Specify if the store should be enabled for Collect In Store. |
Fascia Settings
If you provide a custom export of store locations, this feature can be used to import that data into Aurora. The imported data can then be used as alternative branded stores, available to customers for selection, when choosing to collect an order from a store. The settings related to this feature are managed on the Fascia Settings tab.
To use the Fascia feature of Aurora, some initial set up will be required. Please speak to you Account Manager for further information.
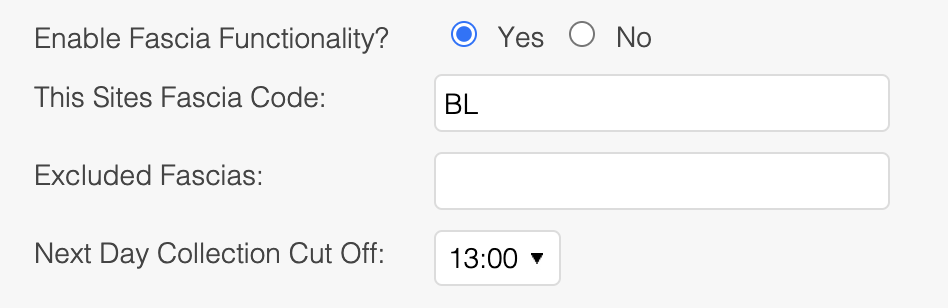
The Fascia feature can be enabled using the radio boxes available.
The Sites Fascia Code is cross referenced against the data provided in your export, identifying which alternative locations can be used for collecting orders in store.
You can also specify the Next Day Collection Cut Off time.
Uploading and Downloading Stores in Bulk
Changes to a large number of stores can be made quickly via a CSV file. You can download a list of the stores currently set up in Aurora, make the changes and additions you require using your preferred spreadsheet application, and then re upload the CSV file back into Aurora.
Downloading Stores
To download a CSV file of stores currently set up in Aurora, select the Download link, which is located on the Download .CSV tab of the Orders > Shipping > Stores page.
Uploading Stores
Having used the downloaded CSV file as a basis for any changes, you can re upload it via the Upload .CSV tab on the Orders > Shipping > Stores page.
When making alterations to existing stores, take care not to edit their unique Location ID.
Field | Column | Description | Example Value |
|---|---|---|---|
Location ID | A | Unique ID assigned to the store | 7 |
Active | B | 1 or 0. 1 for active and 0 for not active | 1 |
Location Type | C | The type name of the store. | Full Feature |
Location Name | D | The name of the store | Cambridge Store |
Filename | E | The filename of the store. | cambridge-store |
Address 1 | F | The first line of the stores address | 1 High Street |
Address 2 | G | The second line of the stores address | Trumpington |
Town | H | The town in which the store is located | Cambridge |
County | I | The county in which the store is located | Cambridgeshire |
Postcode | J | The postcode for the store | CB2 3HG |
Country | K | The country in which the store is located | United Kingdom |
Opening Hours | L | The opening hours of the store. | Mon - Sat |
Telephone | M | The telephone number of the store | 01223 123123 |
Latitude | N | The latitude of the stores location | 52.176796 |
Longitude | O | The longitude of the stores location | 0.112934 |
Store ID | P | Your internal store ID | 1234 |
Enabled for Collect In Store | Q | Specifies if the store can be selected for collecting orders in store | 1 |
Enabled for Reserve In Store | R | Specifies if the store can be selected for reserving orders in store | 1 |
Email Address | S | The email address of the store |
Additional Fields
You are able to upload Store Additional Fields using the "adtl:" parameter at the beginning of each header row to signify that it is an Additional Field. For example, "adtl:My Field" would import a new field called "My Field" into Aurora. You would then be able to edit this to include any values you wished.
Additional Fields for Stores only allow a single value. If it does not exist it will enter a new value, but if it already exists it will overwrite it with what is in your CSV.
Example CSV
Updated 4 months ago