
Klarna
Klarna is a payment provider that offers a range of additional payment options, including finance. Aurora's integration with Klarna allows your customers to make use of Klarna's payment methods when placing orders via the Aurora Front-end.
This article describes how to setup and enable various Klarna Payment features.
Initial Setup
The Klarna Integration uses the Aurora Microservice (MS) framework, and as such must be set-up in advance of it's full activation on your Store.
Doing this requires a one-off development to configure your Server(s) to provide the service, after which, you can then configure the integration at your own leisure.
If you have not yet had (or do not know if you have had) the Klarna MS set up and configured for your Store, then please contact your Agency for more details regarding how to get this done.
This document describes the settings in Aurora required for the Klarna Payments integration to function. There may be other settings and procedures required by Klarna (in the Klarna control panels/accounts) for you to complete before your store can go live, however you should contact your Klarna Account Manager or Support Contact for assistance managing this side of the integration.
The Klarna Integration does not support immediate payment capture, only deferred capture and release.
Deferred payments can then be released using one of two methods:
- Manually, from the View Order page.
- Automatically, based on when an order reaches a particular status i.e. Despatched
- You will need to mark one order status as "Deferred Payment" i.e.
Orders > Statuses > Order Statuses > Despatched- Please note that should a release not be successful, the order will not be updated with the status. This should be considered with regard to how your business rules handle different order states.
Aurora Backend Settings
The Klarna payment options are not usable when placing new orders using the Orders > New Order section of the Aurora Back-end. It may only be used by the customer during checkout on the Front-end.
This section describes how to configure the Klarna integration for use on your Store's Front-end once it has been enabled for use on your Store(s).
Once the Klarna integration has been enabled for your Store(s) to use, which is a process that requires you to contact your Agency to complete, you can follow these steps to allow your customers to use it on your Store(s) checkout.
Microservice Settings (Store > Microservice > Proxy Klarna)
Aurora currently only uses Klarna's EU API Endpoint.
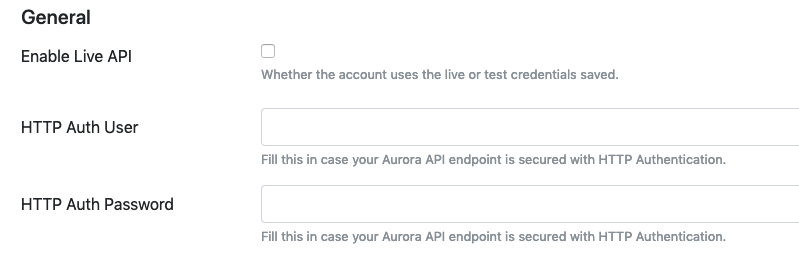
The Klarna settings (including your Klarna API Account details and access tickets, etc.) are configured from the Store > Microservices > Proxy Klarna section of the Aurora Back-end. This page controls the settings used by Aurora to contact the Klarna service.
Parameter Name | Value For Integration | Notes |
|---|---|---|
Enable Live API | checked - for live | This controls whether the sandbox mode is enabled for testing the integration. |
Live API Username | "YOUR-KLARNA-LIVE-API-USERNAME" | Add your Klarna API username used for the production/live environment. |
Live API Password | "YOUR-KLARNA-LIVE-API-PASSWORD" | Add your Klarna API password used for the production/live environment. |
Test API username | "YOUR-KLARNA-TEST-API-USERNAME" | Add your Klarna API username used for the test environment. |
Test API password | "YOUR-KLARNA-TEST-API-PASSWORD" | Add your Klarna API password used for the test environment. |
Aurora API Endpoint |
| The URL for your Aurora API endpoint, available for your Aurora instance. ex: |
Aurora API Version | "1.5" | Choose which Aurora API version to be used. |
Aurora API Token | "super_secret_token...." | Add your Aurora API token. Required methods for the API user are:
It is recommended that the Klarna integration is issued with its own dedicated Aurora API Token to allow more secure control over its use. Please see Aurora API User Management for more detail regarding how to manage your Aurora API Users and their Tokens. |
Http Auth User | "http_auth_user..." | Add your HTTP Auth User for the HTTP authentication. |
Http Auth Password | "http_auth_pass..." | Add your HTTP Auth Password for the HTTP authentication. |
Border Colour | "#FF9900" | Option for customising the Klarna Form Widget. CSS hex colour (e.g. #FF9900). |
Selected Item Border Colour | "#FF9900" | Option for customising the Klarna Form Widget. CSS hex colour (e.g. #FF9900). |
Button Colour | "#FF9900" | Option for customising the Klarna Form Widget. CSS hex colour (e.g. #FF9900). |
Button Text Colour | "#FF9900" | Option for customising the Klarna Form Widget. CSS hex colour (e.g. #FF9900). |
Checkbox Colour | "#FF9900" | Option for customising the Klarna Form Widget. CSS hex colour (e.g. #FF9900). |
Checkbox Check Colour | "#FF9900" | Option for customising the Klarna Form Widget. CSS hex colour (e.g. #FF9900). |
Details Colour | "#FF9900" | Option for customising the Klarna Form Widget. CSS hex colour (e.g. #FF9900). |
Header Colour | "#FF9900" | Option for customising the Klarna Form Widget. CSS hex colour (e.g. #FF9900). |
Link Colour | "#FF9900" | Option for customising the Klarna Form Widget. CSS hex colour (e.g. #FF9900). |
Text Colour | "#FF9900" | Option for customising the Klarna Form Widget. CSS hex colour (e.g. #FF9900). |
Secondary Text Colour | "#FF9900" | Option for customising the Klarna Form Widget. CSS hex colour (e.g. #FF9900). |
Border Radius | "10px" | Option for customising the Klarna Form Widget. CSS border-radius (e.g. 10px). |
Store > Settings > Feeds > Microservice > Proxy Klarna
Configure visibility of the Klarna payment option (in conjunction with the "Store > Settings > Payment Providers > Payment Types Accepted at Checkout" setting):
Parameter Name | Value For Integration | Note |
|---|---|---|
Enabled? | checked | Controls whether the Klarna payment option is visible on your checkout page: |
This 'visibility behaviour' is enforced entirely within the Aurora Front-end Templates and so is the default behaviour offered by the Aurora Demo Example Front-end Templates, but may not be how your own Front-end Templates are configured.
If you run into issues with payment option visibility, please check your Front-end Templates for the appropriate logic.
Store > Settings > Payment Providers
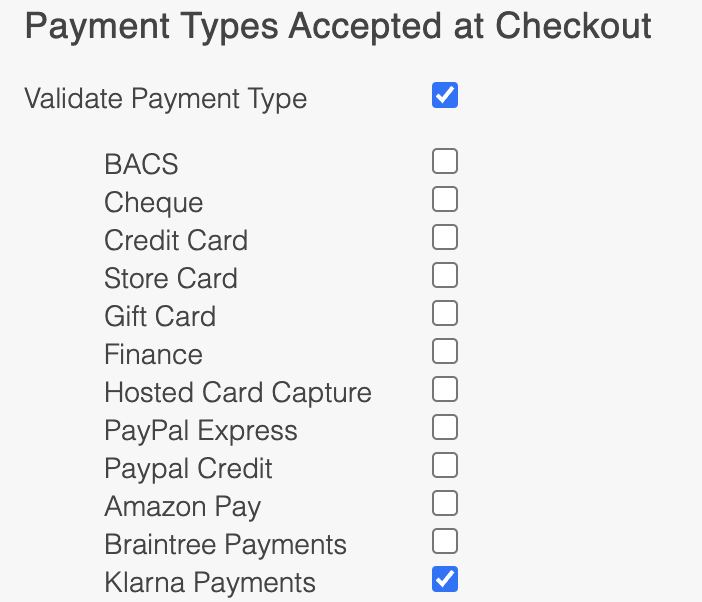
Once the MS is enabled and configured, you should tell Aurora that it can accept orders through the checkout using the Klarna payment option(s). To do this go to the Store > Settings > Payment Providers section of the Aurora Back-end and enable Klarna as shown below.
Parameter Name | Value For Integration | Notes |
|---|---|---|
Validate Payment Type | checked | Controls whether the checkout enforces a strict/reduced list of payment types: |
Klarna Payments | checked | Controls whether Klarna Payments are allowed in the list of payment types: |
This 'visibility behaviour' is enforced entirely within the Aurora Front-end Templates and so is the default behaviour offered by the Aurora Demo Example Front-end Templates, but may not be how your own Front-end Templates are configured.
If you run into issues with payment option visibility, please check your Front-end Templates for the appropriate logic.
Aurora Checkout: Frontend Template Integration
Assets and Templates
The Klarna Integration requires a range of changes to be applied to your Front-end Templates in order to include it in your checkout process. This section describes what templates and/or JavaScript files are required for the Klarna integration, and so may need to be added to your Front-end Templates (if you have not already done so).
Please see the following list of templates and assets used by this integration that should be added to your site templates if they have not been already. Please review each of the items below:
File | Purpose | Notes |
|---|---|---|
templates/example.com/_js/klarna.config.js | Aurora Klarna Configurations Javascript Library | This script should be added into any page that uses Klarna in the frontend e.g. the basket page (see example modification below) and the Klarna checkout page (already added in the template by default). |
templates/example.com/_js/klarna.payments.js | Aurora Klarna Payments Javascript Library | This script should be added into any page that uses Klarna in the frontend e.g. the basket page (see example modification below) and the Klarna checkout page (already added in the template by default). |
templates/example.com/checkout/klarna/payment-methods-setup.tpl.html | Template for the additional Klarna Payment Methods | This template will be loaded when Klarna is available at the checkout page. It includes: |
templates/example.com/checkout/payment-klarna-setup.tpl.html | Template for the Klarna Payment Setup page | The Klarna Javascript Widget is loaded on this page. |
Please note that these are all provided with a view to having them working within the Aurora demo website. As such, if you have customised your Templates and their supporting JavaScript files away from the standard Aurora Demo implementations, you may need to use these files for 'inspiration' only.
Aurora Klarna Configurations JavaScript library
klarna.config.js
window.KlarnaPayments = window.KlarnaPayments || {};
window.KlarnaPayments.configurations = {
    debug: true,
	labels: {
		pay_later: "Pay Later with Klarna",
		pay_over_time: "Slice It with Klarna"
	}
};
Attribute | Type | Example value | Comment |
|---|---|---|---|
debug | Boolean | true | Determines if the Klarna Payments JavaScript library should run in debug mode. This will enable some console logging features. |
labels | Object | Object that contains the texts for all the additional Klarna payment methods | |
labels.pay_later | String | "Pay Later with Klarna" | Label for pay_later payment method |
labels.pay_over_time | String | "Slice It with Klarna" | Label for pay_over_time payment method |
Aurora Klarna Payments JavaScript library
Initialise the additional payment methods
window.KlarnaPayments.initPaymentMethods({
    container: $("#klarna-payment-options-container"),
    template: $("#payment-methods-template"),
    category_identifier_input: $('#payment_category_identifier'),
    client_token_input: $('#klarna_client_token'),
    response_format_input: $('#klarna_response_format'),
    order_ref: "unique-order-reference-id-per-instance"
});| Option | Type | Example value | Notes |
|---|---|---|---|
| container | jQuery object reference | <br />$("#klarna-payment-options-container")<br /> | The jQuery reference to the container that will hold all additional Klarna related payment types and fields. |
| template | jQuery object reference | $(``"#payment-methods-template"``) | The jQuery reference to the template that will be used for each additional field. The $template.html() will be used when the additional field is created. |
| category_identifier_input | jQuery object reference | $(``'#payment_category_identifier'``) | The jQuery reference to the input field that will be populated with the selected Klarna payment method. |
| client_token_input | jQuery object reference | $(``'#klarna_client_token'``) | The jQuery reference to the input field that will be populated with the 'client_token'. |
| response_format_input | jQuery object reference | $(``'#klarna_response_format'``) | The jQuery reference to the input field that will be populated with the proper response format used within the library. |
| order_ref | String | 'UNIQUE-ID...' | The value within this option is used internally to add uniqueness for each instance and client token. The value is used to build a sessionStorage key, that will be used to store the current unique client token, returned by Klarna. |
Initialise the payment setup page
window.KlarnaPayments.initPaymentSetup({
    container: "#klarna_widget_container",
    form: $("#payment_setup_form"),
    form_submit_button: $("#submit_order_button"),
    authorization_token_input: $("#authorization_token"),
    client_token: client_token,
    payment_method_category: payment_category_identifier
});
Option | Type | Example value | Notes |
|---|---|---|---|
container | DOM Selector as String |
| Klarna's Widget will be loaded within the element with this selector. |
form | jQuery object reference |
| The jQuery reference to the form used at Payment Setup page. |
form_submit_button | jQuery object reference |
| The jQuery reference to the form submit button. |
jQuery object reference |
| The jQuery reference to the input field that will be populated with the 'authorization_token'. | |
client_token | String |
| The client token received at the checkout page. |
payment_method_category | String | 'klarna-paylater' | The selected payment method at checkout page. |
Template Updates
Template for the additional Klarna Payment Methods (templates/example.com/checkout/klarna/payment-methods-setup.tpl.html)
This contains the minimal code required to enable and render all the additional Klarna Payment Methods.
Here are the parts of the template that are required and should be used:
Include the required JavaScript libraries
{include_js files="klarna.config,klarna.payments"}The template to be used for each additional payment type.
<!-- Template for customising the payment methods -->
<script type="text/template" id="payment-methods-template">
    {literal}
        <p>
            <input type="radio" class="radio" name="payment_type" value="proxy-klarna" id="{payment_category_id}"/>
            <label class="checkout_label_radio"  for="{payment_category_id}">{payment_category_label}</label>
        </p>
    {/literal}
</script>
The required input fields that should be available within the template. These fields will be used to send all the additional information required by the Klarna implementation
<!-- Container where the Klarna`s payment methods will be added and handled later -->
<div id="klarna-payment-options-container">
    <input name="payment_custom_fields[payment_category_identifier]" id="payment_category_identifier" type="hidden" />
    <input name="payment_custom_fields[client_token]" id="klarna_client_token" type="hidden" />
    <input name="payment_custom_fields[format]" value="html_fragment" id="klarna_response_format" type="hidden" />
</div>
The script that will initialize Klarna Payments JavaScript library
<!-- Onload script that will init the Klarna`s payment methods  -->
<script type="text/javascript">
    var payLaterLabel = '{site_text page="Checkout" part="Label: Pay Later with Klarna"}';
    var sliceItLabel = '{site_text page="Checkout" part="Label: Slice It with Klarna"}';
    var orderRef = '{$basketReference}';
    {literal}
        $(document).ready(function() {

            try {

                window.KlarnaPayments.configurations = window.KlarnaPayments.configurations || {};
                window.KlarnaPayments.configurations.labels = {
                    pay_later: payLaterLabel,
                    pay_over_time: sliceItLabel
                };

                window.KlarnaPayments.initPaymentMethods({
                    container: $("#klarna-payment-options-container"),
                    template: $("#payment-methods-template"),
                    category_identifier_input: $('#payment_category_identifier'),
                    client_token_input: $('#klarna_client_token'),
                    response_format_input: $('#klarna_response_format'),
                    order_ref: orderRef
                });

            }
            catch(err) {
                //Something is wrong with the initialisation
            }
        });
    {/literal}
</script>
Template for the Klarna Payment Setup page (templates/example.com/checkout/payment-klarna-setup.tpl.html)
This contains the minimal code required to enable and render the Klarna Payment Setup page.
Here are the parts of the template that are required and should be used:
Include the required JavaScript libraries
{include_js files="klarna.config,klarna.payments"}The form required for submitting the data to Aurora
<form action="{if $language_iso}/{$language_iso}{/if}/checkout/payment-setup-submit" method="post" id="payment_setup_form" class="payment_setup_form">

    <div id="klarna_widget_container"></div>

    <div class="submit_order_container">
        <input type="hidden" name="submit_order" value="true" />
        <input id="authorization_token" type="hidden" name="authorization_token" value="" />
        <input id="submit_order_button" type="image" name="submit_order" {site_text page="Global" part="Link: Place Order & Pay" type="value"} width="345"  class="checkout_placeyourorder" src="/templates/{$templates_dir}/_images/buttons/placeyourorder.png" {site_text page="Checkout" part="Image Alt: Place Order & Pay" type="alt"} />
    </div>
</form>
The script required to initialize the Klarna Payment Setup page
<script>
    var client_token = '{$parameters.client_token}';
    var payment_category_identifier = '{$parameters.payment_category_identifier}';
    {literal}
        $(document).ready(function() {
            try {
                window.KlarnaPayments.initPaymentSetup({
                    container: "#klarna_widget_container",
                    form: $("#payment_setup_form"),
                    form_submit_button: $("#submit_order_button"),
                    authorization_token_input: $("#authorization_token"),
                    client_token: client_token,
                    payment_method_category: payment_category_identifier
                });
            }
            catch (err) {
                //Something is wrong with the initialisation
            }
        });
    {/literal}
</script>
Updated 4 months ago