
Data Transfer
The Data Transfer system allows data (Content Pages, Product Categories, etc.) to be exported from one Aurora store into another. This allows you to publish data from Test Stores to Production Stores easily or simply keep all your stores inline with one another should you wish to.
This article describes in more detail what the Data Transfer system can do and how to use it.
Introduction
The Data Transfer system allows data (Content Pages, Product Categories, etc.) to be exported from one Aurora Store into another. This allows you to publish data from Test Stores to Production Stores easily or simply keep all your stores inline with one another should you wish to. These exports can be built using a wide array of configurable options including the Aurora Labels system, which allows you to group data by predefined content labels and find them for export more easily.
The Data Transfer system can be accessed from the Aurora Back-end under Tools > Data Transfer > Import/Export/Log.
Supported Data Types
Currently the Data Transfer feature allows you to transfer all of the following content between Aurora Stores:
- Snippets
- Site Text
- Product Categories
- Content
All of the above Data Types will also include any translations contained within the Aurora Multi-lingual system.
Overview
Broadly speaking, the process you will follow to transfer data from one store to another is as follows:
-
Export your data, involving:
- Choosing the data to be exported.
- Reviewing the data to be exported (to ensure it is as desired).
- Downloading the Zip file.
Accessed from the Aurora Back-end under Tools > Data Transfer > Export.
-
Importing your data, involving:
- Uploading the ZIP file.
- Reviewing the data to ensure it is valid.
- Saving the data.
Accessed from the Aurora Back-end under Tools > Data Transfer > Import.
There is one final section called Logs which allows you to view the past 30 days worth of import and export requests and even re-download the files should you wish to perform them again.
Accessed from the Aurora Back-end under Tools > Data Transfer > Log.
Creating a Data Transfer file
Step 1: Search for and Select Data
First, go to the Aurora Back-end under Tools > Data Transfer > Export. This is where you will identify the content items you would like to Export from your Store.
This first step involves searching for your content using the filters detailed below and then selecting from the results the item you would like to include. You can filter by:
- Date
This controls the period of time over which the products must have been either created or modified (see Date Types below).

- Content Types
This controls the types of content that will be returned by the search.

- Labels
This limits the search results to include only items that have the selected label assigned to them.

- Date Types
This controls which type of date is being checked by the above period, e.g. you can select to search for products created in the last 30 days, or perhaps just edited in the last 30 days.

The search will only return 1000 results before it stops searching. These results will be paged over as usual, however if your items are not found in the search results, you may need to refine your search in order to reduce the result-set to a quantity of less than 1000.
Once you are ready to search, click the Search button and your results will appear below for you to choose from, as shown below.

To add any of the search results to your Export, click the tick-box to the far right of the result, labelled "Add".Further to this, you can also use the "ADD ALL VISIBLE" and "EXPORT ALL RESULTS" options to either:
- ADD ALL VISIBLE: Add the current page of results to the list of selected items.
- EXPORT ALL RESULTS: Skip the selection process and simply export all results.
As you select your data for transferral, it will appear in the "Selections" section at the bottom of the pages, as show below.

To remove data from the list of selected items, click the "REMOVE" button at the far right of the item in question.Further to this, you can also use the "CLEAR ALL VISIBLE" and "EXPORT SELECTED" options to either:
- CLEAR ALL VISIBLE: Remove the current page of selected results from the selection.
- EXPORT SELECTED: Export the current selection of results.
Once you have opted to export your selections, using either the "EXPORT SELECTED" or "EXPORT ALL RESULTS" results, you will be taken to Step 2 where Aurora will review your data ready for export and confirm some final options (such as languages and options fields to be included).
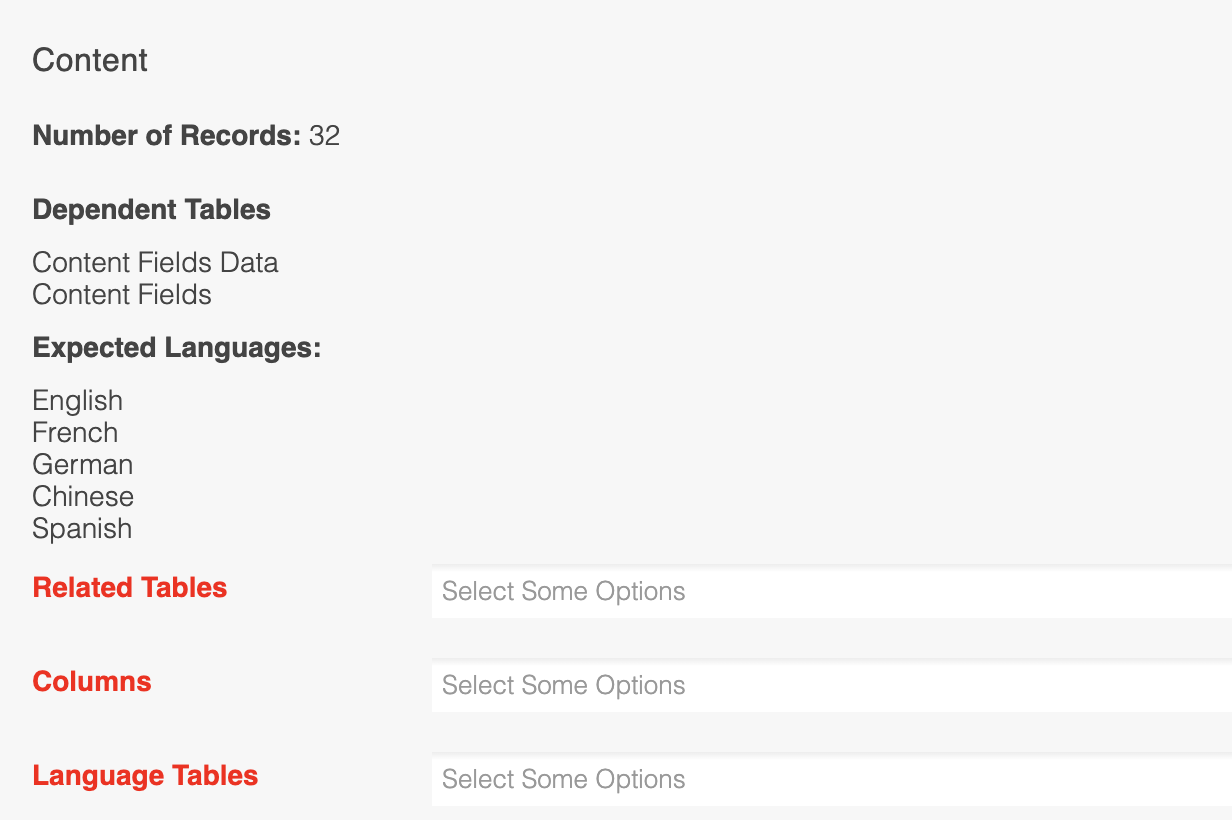
Step 2: Review selected Data
Once you have selected your data to be exported and submitted them for export, Aurora will present a summary of the data to be exported and request that you confirm for each and every data type being exported:
- Which Related Tables you would like to include.

Related tables allow you to export data that is related to the data being exported as a base. For example, Content Pages have Tags that can be exported if you wish. Alternatively, you can simply export the Content Page itself to update it's content without also updating the Tags.
- Which Columns you would like to include.

Some data comes with optional columns that you can choose to export or not as you see fit. This allows you to just export the core information related to a data items or also include some other less important fields if you have also customised these.
- Which Languages you would like to include.

This allows you to select which languages you would like to include in the Transfer. This field can be left blank without any option selected if there are none to be chosen from and only the default language is available. If others are available, you can select as many or as few of the available languages.
The list of languages will only include languages that actually have translations for the data being exported, e.g. you might have Chinese configured in Aurora, but unless you select data that has a Chinese translation, this will not be included here as an option.
An example of this can be seen below for a Content Page export.
Step 3: Download the Data Transfer file
Once you are happy with your selections, you should click the "EXPORT SELECTED" button to instruct Aurora to generate the Export ZIP file, which will begin to download automatically once it is ready.
This process can take quite some time if you have selected a large dataset. With this in mind, please be patient when waiting for the file to download and do not leave or refresh the page until it is complete to ensure you receive the entire file.
Now you have the ZIP file, please ensure this is kept safe.
This file is an unprotected copy of your data and so can be accessed by anyone that receives it.Furthermore, you should not attempt to edit the files in any way manually, as Aurora performs checks to ensure these files have not been tampered with in any way as a measure to help prevent data corruption during the transfer process.
Importing a Data Transfer file
You cannot proceed here until you have created a Data Transfer ZIP file using the step described in the Creating a Data Transfer file section.
Step 1: Upload the Data Transfer ZIP file
Once you have your Data Transfer ZIP file, go to the Aurora Back-end under Tools > Data Transfer > Import.
On this page you will be prompted to select a file to upload to Aurora.
Select your Data Transfer ZIP file and click the "IMPORT" button.
Step 2: Validate the Data
Aurora will now review your Data Transfer ZIP file and ensure:
- That the file has not been tampered with.
- That the items being transferred can be imported without any problems occurring (like duplication or corruption of data).
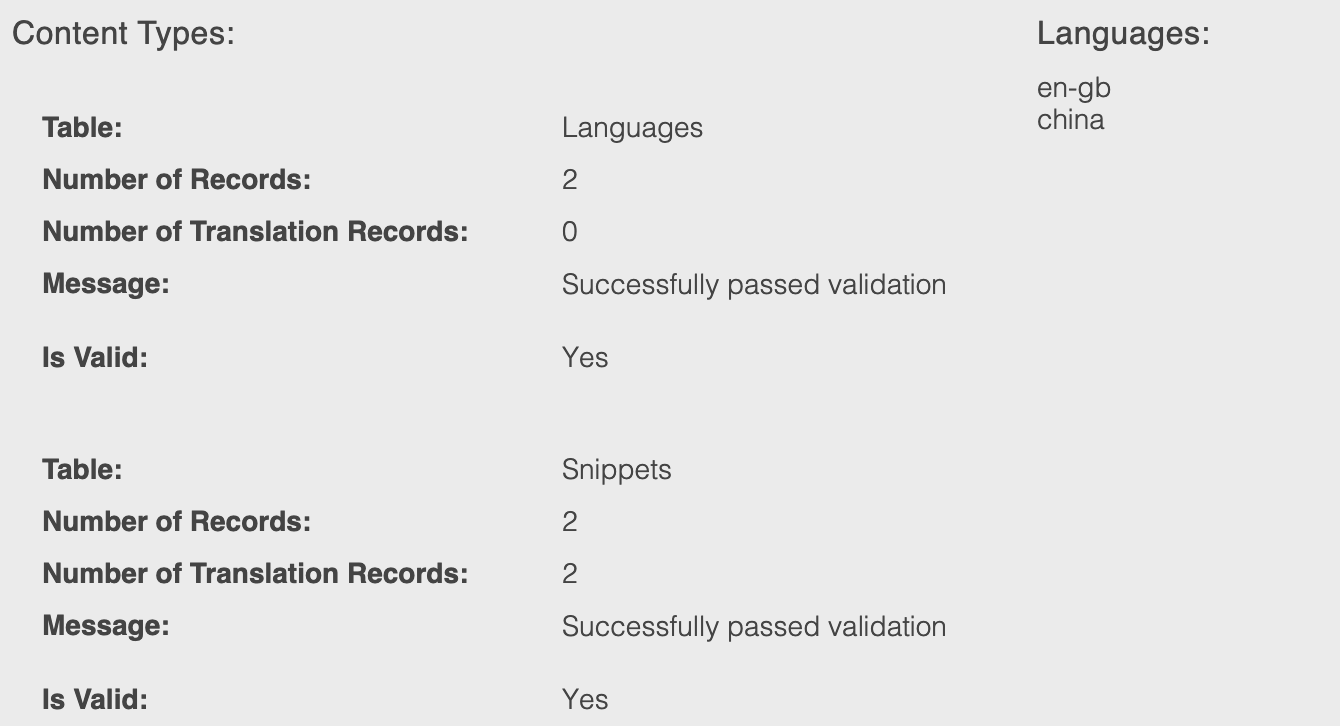
Once this is done, you will be presented with a summary of the findings.
If there are any errors, these will be detailed on the page next to the items causing the problem and sometimes you may be required to remove items either from your Data Transfer file (by following steps 1 though 3 from the Creating a Data Transfer file section) or from the Store into which you are attempting to import the data.
The summary will detail all of the following for every data type being transferred:
-
Table - The name of the Data Type being transferred.
-
Number of Records - The number of records to be imported for this Data Type.
-
Number of Translation Records - The number of translations for the Data Type being imported.
-
Message - Any relevant 'success' or 'failure' messages.
-
Is Valid - Was the data found to be valid and safe to import (Yes/No)?
-
Missing Optional Columns - A list of the optional columns that the Data Transfer is not including.
There is only one setting for you to choose from on this page, the "Import mode" option. This allows you to do one of the following two things:
- Keep existing related data
Related data in the Store you are transferring the data to will be left as it is, unless it is overwritten by new data from the Data Transfer ZIP file.
- Remove existing related data
Related data in the Store you are transferring the data to will be removed completely when importing data from the Data Transfer ZIP file.
This only affects related data and has no impact on the main data being imported which will always Update or Insert data.
If you are happy with the information provided, then you can click the "PROCEED WITH IMPORT" button to commit to the transfer.
WARNING: Clicking the "PROCEED WITH IMPORT" button will start the import. Once this is complete, you cannot easily revert your data so be certain that you are:
- Importing the correct ZIP file.
- Happy with the changes to be imported with immediate affect.
Step 3: Import the Data
This final step simply describes what occurred during the update, as shown below.
Logging
Every time a file is exported or imported, a label is created in the following format:
export-2016-11-24T14:31:50+00:00
These labels will be associated with all content that was either exported or imported, and a copy of the files will also be kept. This is so you are able to recreate or view what has been imported and exported in the recent past, or at least any data that has been matched to them still.
These logged files and labels will be kept in Aurora for a maximum of 30 days, after which they are deleted from the system.
Updated 3 months ago