
Adyen Point of Sale (POS)
Adyen is a payment provider that offers a range of additional payment options. Aurora's integration with Adyen allows your customers to make use of Adyen's payment methods when placing orders via the Aurora Front-end.
This article describes how you can setup Aurora to use an Adyen POS terminal to make payments.
This article does not cover setting up your Adyen account, configuring access to the Adyen API or notification webhooks. Please refer to the Adyen and Adyen Notifications documentation.
Introduction
The Aurora Adyen Point of Sale integration allows you to take card payments from the Aurora PDP, Basket and Checkout pages using a physical terminal.
How does it work?
Once you have setup your Adyen terminal, configured Aurora and implemented the appropriate template updates, a Terminal Payment button can be rendered on the Aurora PDP, Basket and Checkout pages e.g.

On the PDP and Basket, this will initiate an Express Checkout dialog that will be automatically populated using the customers last recorded address details, if they are logged in to Aurora e.g.

When submitting the Express Checkout or initiating an Adyen Terminal Payment from the main checkout, Aurora will attempt to connect to the configured terminal e.g.
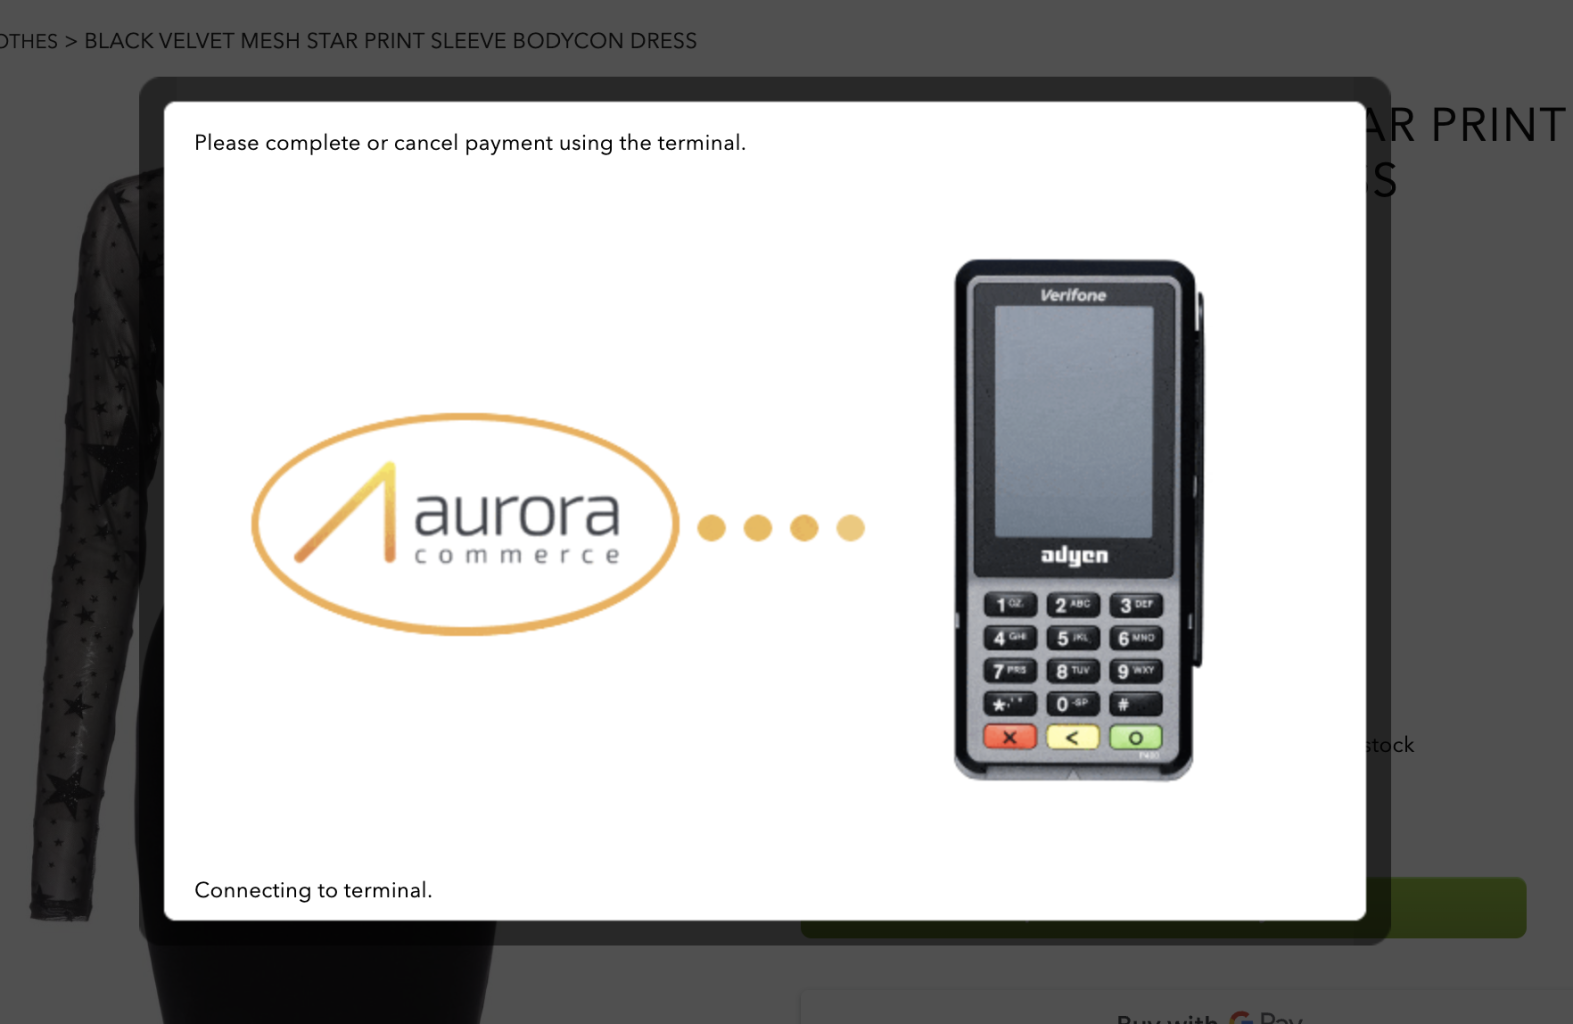
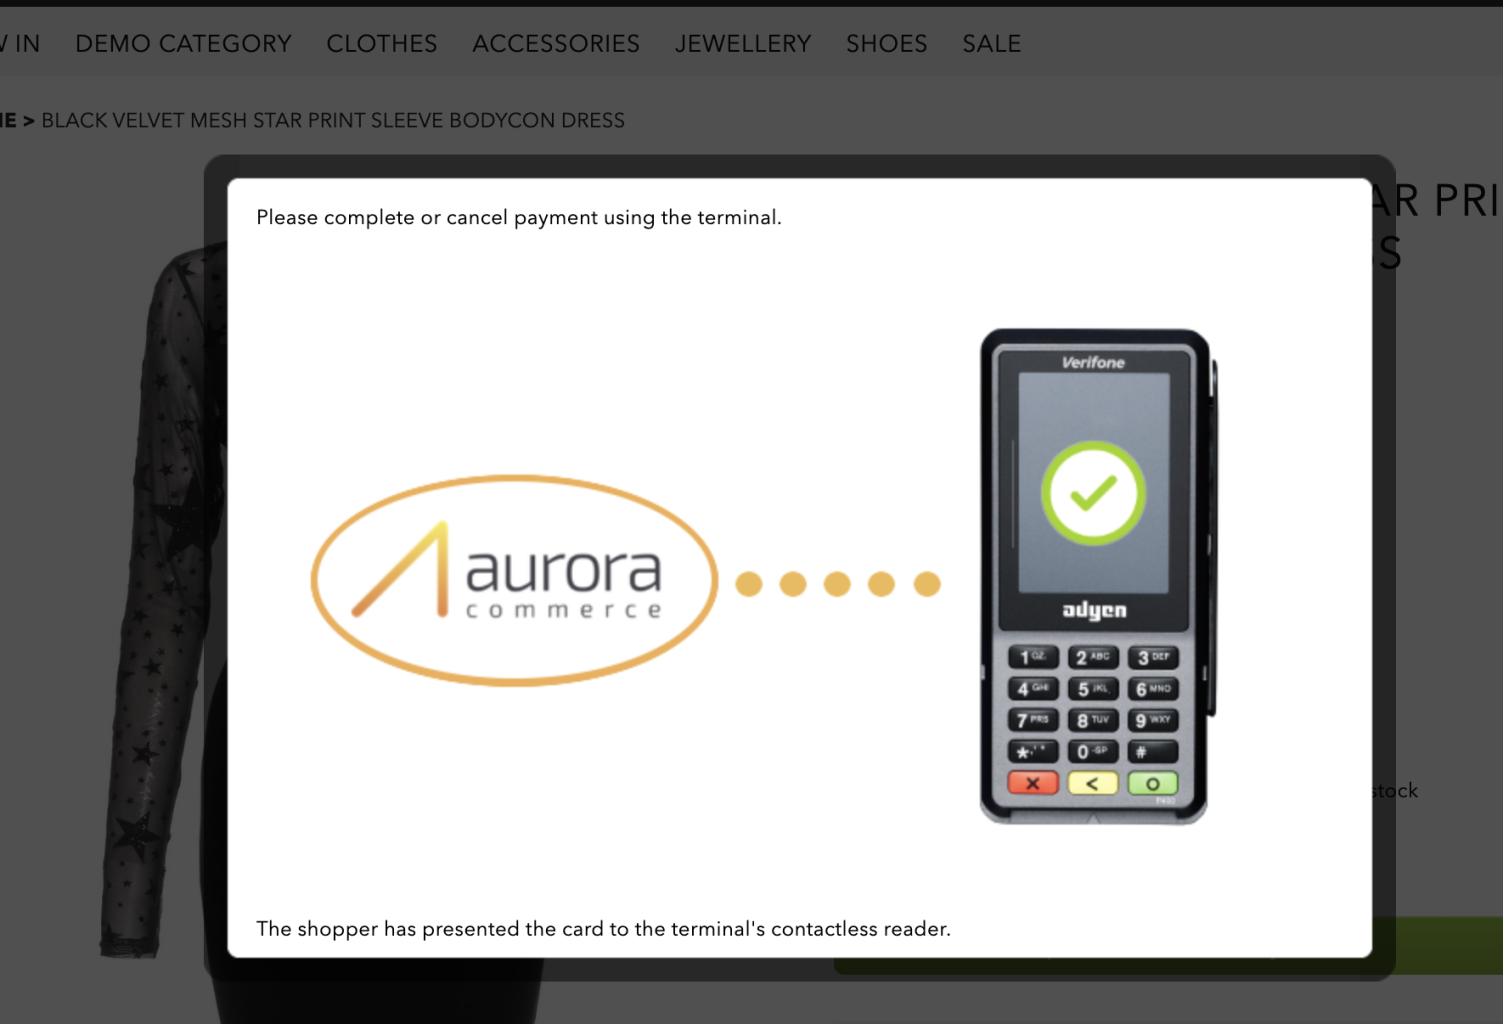
The customer must then present their card to complete payment and Adyen will report the authorisation result back to Aurora for appropriate action to be taken.
Getting started
To start making test payments using an Adyen POS terminal with Aurora you must first order a terminal from Adyen; this can be done through the Adyen Customer Area portal by navigating to:
Point of Sale > Orders and Returns
Whilst waiting for your terminal to arrive, please review the Adyen Point of Sale Getting Started documentation.
Aurora uses the cloud based integration.
Once you've received your terminal, you must set-up and board the terminal; please consult the Getting Started User Manual for your terminal type.
Configuring your Terminal within Adyen
Once your terminal is set-up and you've completed the boarding process, you will need to configure your terminal so that it can communicate with Aurora. This can be configured within the Adyen Customer Area portal for all terminals linked to your account or on a per terminal basis.
For settings that apply to all terminals within your Adyen account navigate to:
Point of Sale > Terminal settings
For terminal specific settings navigate to:
Point of Sale > Terminals > (your terminal)
Terminal integration settings
From within the terminal settings, select Integrations and configure the following settings:
- Enable terminal API: Enabled
- Enable DCC: Enabled
- Enable WebSockets: Enabled
- Event URLs:
https://www.your-domain.com/checkout/payment-server-callback?route=terminal-event&payment_type=proxy-adyen&raw_data=1- Display URLS:
https://www.your-domain.com/checkout/payment-server-callback?route=display-notification&payment_type=proxy-adyen&raw_data=1Terminal currencies
You must ensure that your terminals are configured with the same currency used by Aurora (i.e. GBP) You can verify this by navigating to your terminal settings and selecting Payment features e.g.

If your Aurora chargeable currency is not listed, please contact Adyen support to add the currency.
Configuring the Aurora Adyen plugin
Once you have finished setting up your Adyen account, you need to configure Aurora with your POS Sale ID and terminal IDs. These can be configured within Aurora by navigating to:
Store > Plugins > Adyen > Configure
For security purposes, your template must never include terminal IDs and as such you are able to map your terminal IDs to arbitrary terminal references within the Aurora Adyen plugin settings i.e.
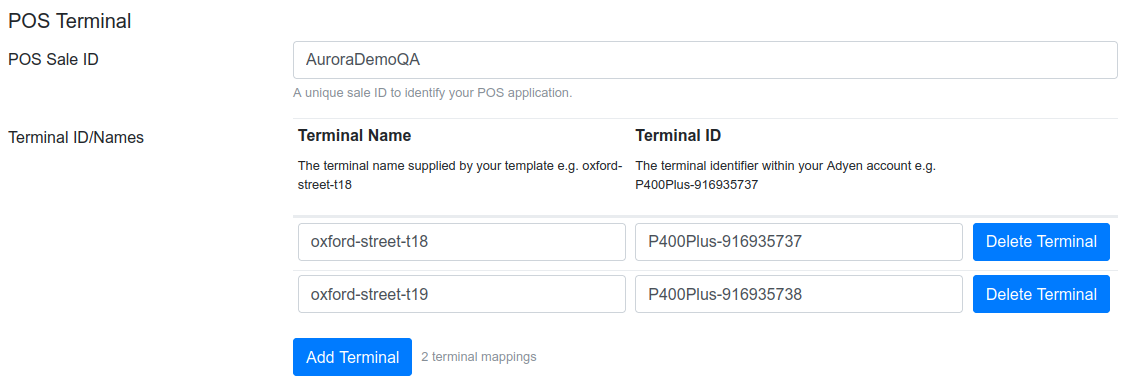
The Aurora Adyen plugin will allow up to 300 terminals to be mapped per Aurora instance.
Aurora Commerce would need to have visibility of when you are activating store terminals so that we can monitor the impact and proactively take any action that may be required to avoid any potential performance issues.
When your template initiates a terminal payment, it should submit a terminal name or reference to identify which terminal should be used (e.g. oxford-street-t18) This is then used to establish which terminal ID should be sent to Adyen.
Terminal IDs can be found within the Adyen Customer Area portal by navigation to:
Point of Sale > Terminals > (your terminal)
The terminal ID is the reference displayed next to the version reference e.g.

Applying the appropriate template updates
Please contact your Aurora Account Manager for access to the Aurora Demo example templates.
This template example uses various plugins including the Aurora Frontend jQuery plugin to render dialogs, trigger events and manage AJAX requests.
This guide assumes that you have already applied the Adyen Payment Components Integration template updates.
The Aurora Adyen Terminal Payments template implementation can be used on the following pages:
- Product Details Page (PDP)
- Basket
- Checktout
You should first source the following files and templates from the Aurora Demo example templates.
Files & Templates
File | Purpose & Notes |
|---|---|
| Aurora Adyen Terminal Payments styles |
| Aurora Adyen Express Checkout styles |
| Aurora Adyen Terminal Payments jQuery Plugin This should always be included on any page that needs to render a terminal payment option. |
| Basket jQuery Plugin Extension This should only be included on the basket page. |
| Product jQuery Plugin Extension This should only be included on the Product Details Page (PDP) |
| Checkout jQuery Plugin Extension This should only be included on the checkout page. |
basket/adyen-pos-button.tpl.html | Template to be included on your Basket page This determines placement of the Express Terminal Payment button. |
products/adyen-pos-button.tpl.html | Template to be included on your Product Display Page (PDP) This determines placement of the Express Terminal Payment button. |
checkout/adyen/express-checkout.tpl.html | Aurora Adyen Express Checkout This is the template express checkout form utilised by the Basket and PDP plugins. |
| The image rendered when attempting to make a terminal payment. |
| The image rendered when receiving a successful terminal payment status. |
| The image rendered when receiving a failed terminal payment status. |
Updates to existing templates
You will also need to make several updates to existing templates.
| File & Purpose | Notes |
|---|---|
| products/details.tpl.html | Update to render an Express Terminal Payment button. |
| basket/index.tpl.html | Update to render an Express Terminal Payment button. |
| checkout/adyen/payment-methods.tpl.html | Update to include the Aurora Adyen Terminal Payments jQuery plugin and a Terminal Payment component placement. |
| _js/adyen.payments.js | Update to inject a Terminal Payment component option. |
Updates to products/details.tpl.html
Include the Adyen POS button template e.g.
{include file="products/adyen-pos-button.tpl.html"}Updates to basket/index.tpl.html
Include the Adyen POS button template e.g.
{include file="basket/adyen-pos-button.tpl.html"}Add data-iso="{$info.iso2|upper}" to the country select input e.g.
<select id="basket_country" name="country" class="basket_country">
{foreach from = $country_list item="info"}
	<option value="{$info.id}" data-iso="{$info.iso2|upper}" {if $smarty.session.shipping_country == $info.id} selected="selected" {assign var='foundCountry' value='true'}{elseif $info.default_country == '1' AND !$foundCountry } selected="selected"{/if}>{$info.country_name}</option>
Updates to checkout/adyen/payment-methods.tpl.html
Include the aatp and aatp.checkout jQuery plugins e.g.
{include_js files="adyen.payments,aatp,aatp.checkout"}Include the aatp and aaec styles e.g.
{include_css files="adyen,aatp,aaec"}Add the POS terminal button placement e.g.
<div id="adyen-pos_terminal-container" class="adyen-payment-container"></div>Updates to _js/adyen.payments.js
Add a POS Terminal option to the responseData in AdyenPayments.loadPaymentMethodData e.g.
if (typeof($.aatp.checkout) === "object") {
	responseData.new_payment_methods.push({name: 'POS Terminal'});
}
Update AdyenPayments.initComponents to initialise the Aurora Adyen Terminal Payment checkout component e.g.
} else if ($(this).attr('id') === 'proxy-adyen-POS_Terminal' && typeof($.aatp.checkout) === "object") {
	$.aatp.init({
		placement: "checkout",
		terminal: {
			// Change this to match your plugin settings
			name: "aurora-terminal"
		}
	}).then(
		() => $.aatp.checkout.init({}),
		e => $.aatp.handleError('basket.init failed', e)
	);
}
Using multiple terminals
As noted within Configuring the Aurora Adyen plugin, your template must specify which terminal to use for the card payment.
The name of the terminal is specified when initiating the $.aatp plugin within the following files:
- products/adyen-pos-button.tpl.html
- basket/adyen-pos-button.tpl.html
- _js/adyen.payments.js
This could potentially be set using a cookie value that is configured specifically for each POS station and matched to the nearest terminal.
Remember that the terminal name must also be mapped to a terminal ID within Aurora Adyen plugin settings.
Express checkout delivery options
The template example restricts POS terminal payments to store delivery options, however this can be changed by updating the aatp.product.js and aatp.basket.js plugins to submit a different shipping_option when requesting or generating a basket e.g.
$.aatp.basket.getBasket = async () => {
  return $.post(
    '/ajax/Ajax_Frontend_Basket/getBasket',
    {
      currency: $.aatp.basket.config.currency,
      country: $.aatp.basket.config.country,
      user_reference: $.aatp.basket.config.basketUserReference,
      shipping_option: 'store_delivery' // or 'home_delivery',
    }
  );
};The function
$.aatp.validateBasketResponseinaatp.jsvalidates that sufficient stores are available for delivery. If a differentshipping_optionis used, this method will need to be modified to bypass this validation.
Terminal display notifications
The terminal will report back to Aurora the current status of the payment session, for example Aurora receives notifications when the customer has been prompted for payment, when they have presented their card, entered a PIN, completed payment etc.
Aurora responds to the browser in kind using the Event identifier, which is subsequently mapped within the Aurora Adyen Terminal Payments jQuery plugin.
The mappings used where sourced from the Display notification types Adyen documentation when the template example was implemented.
In addition to these, Aurora can respond with one of the following:
Event | Description |
|---|---|
CONNECT_TO_TERMINAL | Connecting to terminal. Aurora has sent a request to Adyen and is waiting for a response. |
PAYMENT_REJECTED | Unable to connect to terminal. Adyen has rejected the request. This normally happens when the terminal is switched off, not connected to the internet or is experiencing a communication issue. If you encounter this error, please see the Aurora Integration Log for more details. |
PAYMENT_EXPIRED | Payment session expired. Aurora has not received a response from the terminal within 2 minutes. |
These mappings can be updated within the
$.aatp.getDisplayMessagefunction.
Error responses
A POS payment can result in a number of different outcomes depending on user interaction and payment authorisation.
Aurora uses the ErrorCondition within an Adyen error response as a key to map Adyen errors within the Aurora Site Text system e.g.
| Adyen ErrorCondition | Aurora Site Site | Default Description |
|---|---|---|
| Aborted | CheckoutPayment proxy-adyen Error: PosAborted | Payment aborted |
| Busy | CheckoutPayment proxy-adyen Error: PosBusy | Previous payment attempt still in progress |
| Cancel | CheckoutPayment proxy-adyen Error: PosCancel | Payment cancelled |
| DeviceOut | CheckoutPayment proxy-adyen Error: PosDeviceOut | Failed to connect to terminal, please try again |
| InvalidCard | CheckoutPayment proxy-adyen Error: PosInvalidCard | The card used is invalid |
| NotAllowed | CheckoutPayment proxy-adyen Error: PosNotAllowed | The card used is not allowed |
| Refusal | CheckoutPayment proxy-adyen Error: PosRefusal | Payment declined |
| UnreachableHost | CheckoutPayment proxy-adyen Error: PosUnreachableHost | Unable to contact payment provider, please try again |
| WrongPIN | CheckoutPayment proxy-adyen Error: PosWrongPIN | The PIN entered is incorrect, please try again |
You can modify these within Aurora by navigating to Content > Site Text and selecting Checkout
A list of all possible Adyen error responses can be found within the Adyen Terminal API refusal reasons documentation.
Aurora will also consume and log other data-points within Adyen error responses to provide more detail as to why a payment has failed. To review these details please refer to:
- Orders > Failed Orders
and - Tools > Logs > API Integration Log.
Testing your integration
Once you have completed all steps required to enable the Aurora Adyen Point of Sale integration, you can start making test payments.
Please refer to the Adyen Test your integration documentation for further details of how to test the different error conditions.
Adyen use order amounts to simulate declined payments for different reasons e.g.
- An order value of £11.21 would simulate a cancelled payment.
- An order value of £11.23 would simulate a declined payment.
- An order value of £11.26 would simulate an expired card.
- etc.
Anonymous terminal payments
It may be that a customer does not wish to provide their name, billing address or email address. In this scenario your template must still submit values for these data-points in order to satisfy Aurora's checkout validation.
You could have a feature within your express and traditional checkout implementations that provides the option to not enter customer details, in which case your template then automatically submits a set of anonymous customer details that are used when creating the Aurora order.
POS Payments and Adyen Fraud Rules
Neither the Adyen Point of Sale event notifications or authorisation notifications for Point of Sale orders provide risk or fraud data.
If your order fulfilment process relies on fraud rules, please see the Aurora Fraud Pass Simulator
Updated 4 months ago